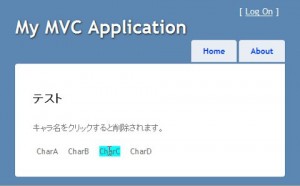
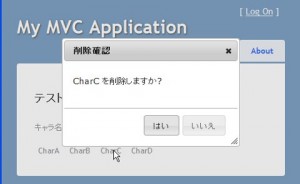
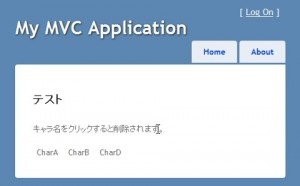
「一覧で表示しているものから選択されたものを操作するときに、確認ダイアログを出したい」と思ったので、ちょっと書いてみました。動作概要はこんな感じです(操作は「削除」ということにします)。
- 一覧で表示しているものの中から削除したいものをクリックする
- 削除して良いか確認するダイアログを表示
- 「はい」ボタンがクリックされたら、サーバーへ POST メッセージで削除を依頼
- サーバーから削除後の一覧が送られてくるので、表示する
ダイアログの表示部分は、jQuery と jQuery UI の Dialog を利用して JavaScript で構築します。
動かしたときの画面はこんな感じ。


新しいプロジェクトの作成で、ASP.NET MVC を選択します。ビュー・エンジンは Razor を選択しています。
テストなので、モデルはこんな感じで(TestModel.cs)。データを DB で保持していないので、シングルトンにしています。
using System;
using System.Collections.Generic;

namespace TestJqueryUi002.Models
{
    static public class TestModel
    {
        static private List<string> _charList;

        static TestModel()
        {
            _charList = new List<string>()
            {
                "CharA", "CharB", "CharC", "CharD"
            };
        }

        static public List<string> GetAllChar()
        {
            return _charList;
        }

        static public void DeletChar(string name)
        {
            _charList.Remove(name);
        }
    }
}
コントローラー(HomeController.cs)
using System;
using System.Collections.Generic;
using System.Linq;
using System.Web;
using System.Web.Mvc;
using TestJqueryUi002.Models;

namespace TestJqueryUi002.Controllers
{
    public class HomeController : Controller
    {
        public ActionResult Index()
        {
            ViewBag.Message = "Welcome to ASP.NET MVC!";

            return View();
        }

        public ActionResult ActionTest()
        {
            ViewBag.Message = "テスト";
            var stringList = TestModel.GetAllChar();
            return View(stringList);
        }

        [HttpPost]
        public ActionResult ActionTest(string id)
        {
            TestModel.DeletChar(id);
            return RedirectToAction("ActionTest");
        }

        public ActionResult About()
        {
            return View();
        }
    }
}
次はビューですが、JavaScript と style を埋め込みたいので、その準備として、\Views\Shared\_Layout.cshtml に細工をします。あと、jQuery.UI を使う準備も。
<head>
    <title>@ViewBag.Title</title>
    <link href="@Url.Content("~/Content/Site.css")" rel="stylesheet" type="text/css" />
    <link href="@Url.Content("~/Content/themes/base/jquery-ui.css")" rel="Stylesheet" type="text/css" />
    <script src="@Url.Content("~/Scripts/jquery-1.4.4.min.js")" type="text/javascript"></script>
    <script src="@Url.Content("/Scripts/jquery-ui.min.js")" type="text/javascript"></script>
    @RenderSection("scripts", required:false)
    @RenderSection("styles", required:false)
</head>
jQuery UI を使えるようにするために、スタイルシートとスクリプトファイルへの参照の追加を行い、さらに</head>の前2行の強調表示をしているところに、個別のヴューで書いたコードが埋め込まれるようにします。required パラメータに false を指定して、ビューでセクションが書かれていないときにエラーが発生するのを抑止しています。(こう書いたほうが何が false なのか見た目でわかるし 😉 )
そして、ビューですが、まず Index.cshtml。
@{
    ViewBag.Title = "Home Page";
}

<h2>@ViewBag.Message</h2>
<p>
    @Html.ActionLink("削除のテスト", "ActionTest")
</p>
これは単にテスト用のページへのリンクを追加してるだけです。
そして、テスト用のビュー(ActionTest.cshtml)
@model List<string>

@{
    ViewBag.Title = "ActionTest";
}

@section styles {
<style type="text/css">
    span.clickable
    {
        margin: 0em 0.5em;
    }

    span.clickable:hover
    {
        background-color: Aqua;
    }
</style>
}

@section scripts {
<script type="text/javascript">
<!--
function showConfirm(e) {
    $("#dialog>p").text(e + " を削除しますか?");
    $("#dialog").dialog({
        title: "削除確認",
        width: 300,
        height: 180,
        modal: true,
        buttons: {
            "はい": function () {
                $("#dialog form").attr("action", "/Home/ActionTest/" + e);
                $("#SubmitForm").submit();
                $(this).dialog("close");
            },
            "いいえ": function () {
                $(this).dialog("close");
            }
        },
        close: function () {
            $(this).dialog("destroy");
        }
    });
}
//-->
</script>
}

<h2>@ViewBag.Message</h2>

<p>キャラ名をクリックすると削除されます。</p>

<div id="charList">
@foreach (var item in Model)
{
    <span class="clickable" onclick="showConfirm('@item')">@item</span>
}
</div>

<div id="dialog" style="display:none;">
<p></p>
<form id="SubmitForm" action="" method="post"></form>
</div>
JavaScript は jQuery を使って書いています。ダイアログで表示する部分は <div id=”dialog” style=”display:none;”> で囲まれたところ。
削除したい キャラ名 をクリックすると showConfirm(e) メソッドが呼ばれます。
まず最初に、削除確認のメッセージを生成して、<p></p>でマークアップされた要素(空文字)と置き換えます。
次の部分がダイアログの生成です。
「はい」ボタンがクリックされたときに呼ばれる匿名メソッドで、Submit のときのリンク先 URL を置き換えてから、Submit() を呼び出します。
例) CharA がクリックされた時には /Home/ActionTest/CharA になります。
ルーティングについての参考情報は次のものを参照するといいかもです。
とりあえず、こんな感じで動いています。なお、あくまで感触を掴むために書いたものなので、エラー・ハンドリングを省いています。もし参考にされる方がいらしたら、ちゃんとエラー処理をしてください 😉
何か気がついたこととかあったら、指摘していただけると嬉しいです 🙂
Got it! Thanks a lot again for hlenipg me out!
Thank you for the comment. I am glad of this article useful for you 😉